Ubuntu 基于 nginx+php+mysql 安装 WordPress 网站
·
4 min read
一. 系统准备
安装操作系统过程略,我们通常是使用阿里云、腾讯云等等云服务器,本文基于全新安装的Ubuntu 22.04 来安装 WordPress。
# 禁用防火墙。云服务器通常有单独的防火墙,所以我们把Ubuntu系统的防火墙禁用掉
$ sudo ufw disable


# 查看防火墙状态
$ sudo ufw status
Status: inactive


# 开启防火墙命令
# sudo ufw enable
二. 安装MySQL
使用的默认的仓库源安装,默认安装的MySQL是8.0版本,更详细的安装步骤见文章:https://yuchaoshui.com/8c46e83/
# 安装 MySQL
$ sudo apt-get install mysql-server


# 安装后需要使用 sudo 免密码进入MySQL控制台,创建用户名密码
$ sudo mysql
mysql> create database wordpress;
mysql> create user 'wordpressuser'@'%' identified by 'User_password123';
mysql> grant all privileges on wordpress.* to 'wordpressuser'@'%';
mysql> FLUSH PRIVILEGES;
在命令行尝试用创建的用户名密码登录,看是否成功:
$ mysql -uwordpressuser -h127.0.0.1 -pUser_password123 -P3306

mysql: [Warning] Using a password on the command line interface can be insecure.
Welcome to the MySQL monitor.  Commands end with ; or \g.
Your MySQL connection id is 18
Server version: 8.0.35-0ubuntu0.22.04.1 (Ubuntu)
Copyright (c) 2000, 2023, Oracle and/or its affiliates.
Oracle is a registered trademark of Oracle Corporation and/or its
affiliates. Other names may be trademarks of their respective
owners.
Type 'help;' or '\h' for help. Type '\c' to clear the current input statement.
mysql> show databases;
+--------------------+
| Database           |
+--------------------+
| information_schema |
| performance_schema |
| wordpress          |
+--------------------+
3 rows in set (0.00 sec)

mysql>
三. 安装nginx与php
同样使用默认的仓库安装 nginx 和php
# 安装 nginx php
$ sudo apt-get install nginx php-fpm php-mysql php8.1-mbstring php8.1-curl


# 安装 nginx 后会自动启动 nginx php-fpm
# 如果为启动可以手动启动 sudo systemctl restart xxx
$ systemctl status nginx.service
$ systemctl status php8.1-fpm.service


# 查看php版本
$ php -v

PHP 8.1.2-1ubuntu2.14 (cli) (built: Aug 18 2023 11:41:11) (NTS)
Copyright (c) The PHP Group
Zend Engine v4.1.2, Copyright (c) Zend Technologies
    with Zend OPcache v8.1.2-1ubuntu2.14, Copyright (c), by Zend Technologies
新建 nginx 配置 sudo vim /etc/nginx/conf.d/macos-software.com.conf, macos-software.com 是的域名,需要提前在域名注册商解析 A记录到服务器的ip地址上。
server {
listen 80;
listen [::]:80;
server_name macos-software.com;
root /var/www/macos_software;
index index.php index.html index.htm index.nginx-debian.html;
location / {
try_files $uri $uri/ =404;
}
location ~ \.php$ {
include snippets/fastcgi-php.conf;
fastcgi_pass unix:/run/php/php8.1-fpm.sock;
}
location ~ /\.ht {
deny all;
}
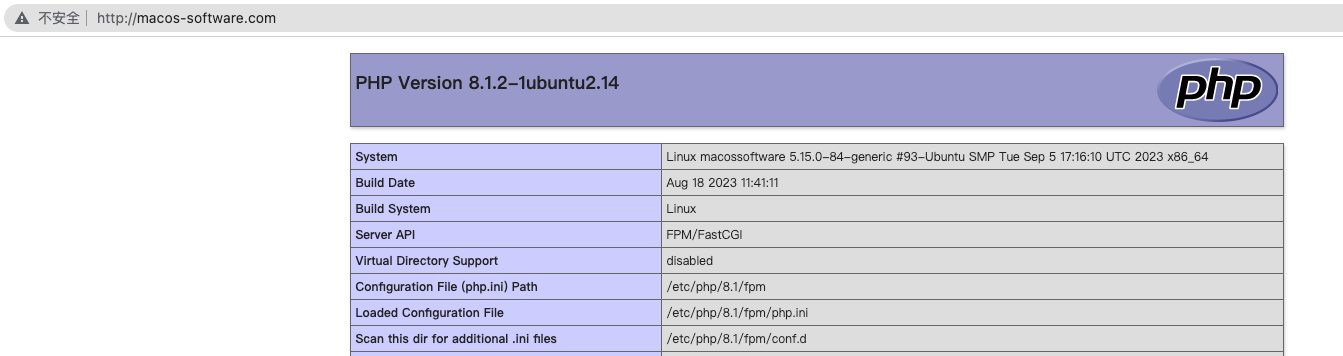
}然后重启nginx,测试是否安装成功,准备下面的目录和文件,然后浏览器访问配置的域名,出现下面截图样式就算成功了:
# 重启nginx
sudo systemctl restart nginx.service


# 准备目录,准备测试页面 index.php
sudo mkdir /var/www/macos_software


sudo vim /var/www/macos_software/index.php
<?php
phpinfo();


# 注意:测试成功后删除 测试 index.php 文件
sudo rm -rf /var/www/macos_software/index.php
四. 安装WordPress
直接下载最新版本的安装,或者直接下载中文版的:https://cn.wordpress.org/download/releases/,中文版的后台管理可以设置中文语言。
# 将安装包解压到指定目录
# wget https://cn.wordpress.org/wordpress-6.3.2-zh_CN.tar.gz
wget http://wordpress.org/latest.tar.gz
tar -zxf latest.tar.gz
sudo mv wordpress/* /var/www/macos_software/


# 配置数据库连接如下
sudo cp wp-config-sample.php wp-config.php
sudo vim wp-config.php


/** The name of the database for WordPress */
define( 'DB_NAME', 'wordpress' );

/** Database username */
define( 'DB_USER', 'wordpressuser' );

/** Database password */
define( 'DB_PASSWORD', 'User_password123' );

/** Database hostname */
define( 'DB_HOST', 'localhost' );


# 配置插件安装需要的选项
define("FS_METHOD","direct");
define("FS_CHMOD_DIR", 0777);
define("FS_CHMOD_FILE", 0777);


# 修改目录权限
sudo chown -R www-data:www-data /var/www/macos_software/
然后访问 /wp-admin/install.php 启动安装程序,按照提示操作即可快速完成安装了。
五. nginx开启https
使用默认仓库源安装:
$ sudo apt-get update
$ sudo apt-get install certbot
$ sudo apt-get install python3-certbot-nginx


# 切换到root用户操作
sudo su -

# 在root用户下,输入下面命令,按照提示输入对应的信息即可开启https
certbot --nginx

# 开启https后,certbot 会重写之前的nginx配置文件